Jump to Recipe
As the cold dissipates and our green friends begin to re-emerge from dormancy, I am reminded of the many important lessons that the plant realm so kindly shares with us.
Patience first comes to mind, as I eagerly await the infinite shades of green & the colorful flowers.
The seasonality of certain plants or parts of that plant that we may use for different preparations encourages our conscious presence at that moment in time.
The sheer abundance and variety of edible and medicinal plants cultivate gratitude.
The most beautiful part of it all is perhaps the fact that these lessons are best learned through experience. Heeding the wild call, we venture into the fresh-scented spring breeze, brush past fragrant fresh leaves and the promise of new, while stepping over the thick layers of fallen foliage that now slowly composts into rich nutritious soil with a promise for the future.
One of my favorite spring plants reminds me that this cycle of death and rebirth has been repeating for eons, and my mind starts to wonder how many beings this prehistoric plant has nourished along the way.
Observing Ostrich ferns (Matteuccia struthiopteris) in the spring is akin to traveling back in time. According to fossil records, it seems that our friendly ferns date back at least 383 million years. Although the species we have today are not the same as the ones from long ago, their ancient origins have contributed to their diversity, making them the most diverse group of non-flowering plants on earth today.
Although their primary method of reproduction is through underground runners that form new rhizome crowns, their secondary method is more unique and a testament to their resilience, as they do not depend on pollinators, but rather on spores.
Their spore-driven reproduction happens in two generations:
As yet another winter passes and the ground warms, ferns strive to unfurl their fronds, and it is a magical sight. These tightly coiled leaves emerge from below ground in a primordial process called circinate vernation reminding me of the curled-up way in which a human fetus begins to develop.
These wild edibles are colloquially referred to as fiddleheads, and they are one of the most delicious and nutritious gifts of spring.
Ostrich fern fiddleheads are a rich source of the following nutrients:
How to identify Ostrich fern (Matteuccia struthiopteris) Fiddleheads:
Optimal harvest time:
Safety Considerations: Proper plant identification is important!
Although not much is known about other ferns, Bracken ferns have been shown to be poisonous to rats (in laboratory conditions).
How to know if you found a bracken fern:
Ostrich fern fiddleheads are delicious, but they must be cooked. Fresh fiddleheads contain thiaminase, which destroys vitamin B1 when ingested. (see recipe below for cooking instructions)
Sustainable harvesting:
As stewards of the land, we are responsible for protecting it and maintaining it.
Patience first comes to mind, as I eagerly await the infinite shades of green & the colorful flowers.
The seasonality of certain plants or parts of that plant that we may use for different preparations encourages our conscious presence at that moment in time.
The sheer abundance and variety of edible and medicinal plants cultivate gratitude.
The most beautiful part of it all is perhaps the fact that these lessons are best learned through experience. Heeding the wild call, we venture into the fresh-scented spring breeze, brush past fragrant fresh leaves and the promise of new, while stepping over the thick layers of fallen foliage that now slowly composts into rich nutritious soil with a promise for the future.
One of my favorite spring plants reminds me that this cycle of death and rebirth has been repeating for eons, and my mind starts to wonder how many beings this prehistoric plant has nourished along the way.
Observing Ostrich ferns (Matteuccia struthiopteris) in the spring is akin to traveling back in time. According to fossil records, it seems that our friendly ferns date back at least 383 million years. Although the species we have today are not the same as the ones from long ago, their ancient origins have contributed to their diversity, making them the most diverse group of non-flowering plants on earth today.
Although their primary method of reproduction is through underground runners that form new rhizome crowns, their secondary method is more unique and a testament to their resilience, as they do not depend on pollinators, but rather on spores.
Their spore-driven reproduction happens in two generations:
- A diploid sporophyte generation, in which green fertile fronds (sporophytes), emerge in autumn, turn brown and stand erect through winter, in order to release their spores in early spring.
- A haploid gametophyte generation. This generation begins when the spores find fertile ground and germinate into green, finger-nail-sized hearts called gametophytes, which contain both male and female reproductive structures. Once fertilized, gametophytes morph into new plants by sprouting fresh sterile fronds (the pale green leaves we all know them by), as the gametophyte disintegra
As yet another winter passes and the ground warms, ferns strive to unfurl their fronds, and it is a magical sight. These tightly coiled leaves emerge from below ground in a primordial process called circinate vernation reminding me of the curled-up way in which a human fetus begins to develop.
These wild edibles are colloquially referred to as fiddleheads, and they are one of the most delicious and nutritious gifts of spring.
Ostrich fern fiddleheads are a rich source of the following nutrients:
- ascorbate (vitamin C): Essential for the development and maintenance of connective tissue (tissue healing); An important role in osseous (bone) formation; Wound healing, and the maintenance of healthy gums; Plays a role in several metabolic functions like the activation of vitamin B and folic acid; the conversion of cholesterol into bile acids (essential for digestion); the conversion of tryptophan (amino acid) to the neurotransmitter, serotonin; enhances the availability and absorption of iron; An antioxidant protecting the body from oxidative damage; protects the immune system
- antioxidant carotenoids α (alpha) and β (beta): converted into retinol (vitamin A) to help support optimal eye health, stimulate white blood cell production, and help maintain endothelial cells
- lutein and zeaxanthin: These are taken up by the macula of the eye in order to help maintain optimal visual function; phenolic compounds are antioxidants recognized for reducing mutagenesis and carcinogenesis
- High in essential fatty acid content: omega-3 eicosapentaenoic acid (EPA) which supports cardiovascular health and may also increase levels of high-density lipoprotein (HDL/the “good” cholesterol); omega-6 arachidonic acid which can lower low-density lipoprotein (LDL/the “bad” cholesterol), help maintain stable blood sugars, reduces inflammation, reduces the chance of blood clots; γ-linoleic, and dihomo-γ-linoleic which is thought to suppress tumor growth and metastasis and suspected of promoting cardiovascular health
- High in essential minerals and electrolytes such as: Potassium, Iron, Manganese, Copper
How to identify Ostrich fern (Matteuccia struthiopteris) Fiddleheads:
- Newly emerging fiddleheads are bright green and partially covered with thin, brown, paper-like scales. The scales fall off as the fiddlehead grows upward. If you are new to identifying fiddleheads, look for brand new ones that are just popping out of the ground, once you have identified those, you can more assuredly i.d. more mature ones.
- Ostrich ferns have a U-shaped groove on the inside of the smooth stem. The inside refers to the area that is on the same side of the stem as the direction of the inward curling frond (leaf).
- Fiddleheads are green in color. Do not confuse them with the fertile spore-bearing frond, which is: brownish in color, erect and at least 15 inches tall with 25+ ‘pods’ on either side of the stem. You may find ostrich ferns that do not have fertile fronds, but they do help in identifying if you are a beginner.
Optimal harvest time:
- It is best to pick them when they are 2-6 inches in height. I prefer them on the taller side, as the stem is just as tasty as the furl.
- Pick them when still tightly curled.
- Brush off the papery-brown material.
- If they have started to unfurl, they are past their time.
- Fiddlehead season is short and passes by in a blink of an eye!
Safety Considerations: Proper plant identification is important!
Although not much is known about other ferns, Bracken ferns have been shown to be poisonous to rats (in laboratory conditions).
How to know if you found a bracken fern:
- Bracken fern fiddleheads are fuzzy
- They do not have the brown, thin, paper-like scales
- They do not have a U-shaped groove on the inside of the stem
Ostrich fern fiddleheads are delicious, but they must be cooked. Fresh fiddleheads contain thiaminase, which destroys vitamin B1 when ingested. (see recipe below for cooking instructions)
Sustainable harvesting:
As stewards of the land, we are responsible for protecting it and maintaining it.
- Harvest crowns that have at least four fiddleheads.
- This means this plant can sustain a picking.
- If there are less than 4, this could indicate a new/or weak plant, or that someone got there before you.
- Only pick 1/3 of the fiddleheads from any individual crown.
- Only pick from every second or third crown.
- Practice conscious presence when picking fiddleheads, being careful not to damage any other fiddles along the way.
- Take only what you need and will use.
- Never pick from crowns that have been previously harvested.
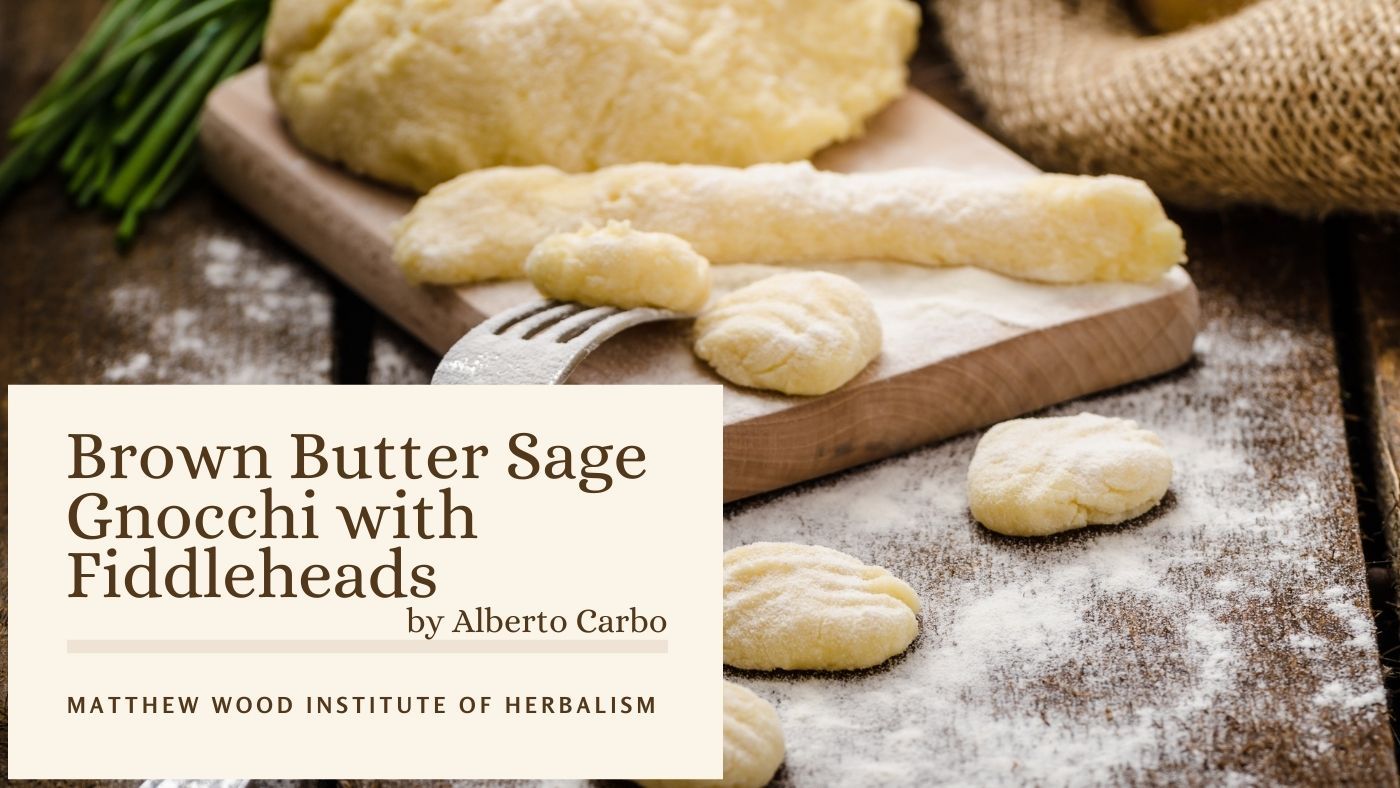
Brown Butter Sage Gnocchi with Fiddleheads*
As always make sure to forage for plants away from roads and pollution as much as possible. Never overharvest any plant, as they are of course not only here for our enjoyment, but also here for the insects, bees, and birds. Have fun out there!
References
- Hoffmann, Cindy. “Matteuccia Struthiopteris (Ostrich Fern): Minnesota Wildflowers.” Accessed April 1, 2022. https://www.minnesotawildflowers.info/fern/ostrich-fern.
- American Fern Society. “About Ferns.” Accessed April 1, 2022. https://www.amerfernsoc.org/about-ferns.
- “Circinate Vernation - Dictionary of Botany.” Accessed April 1, 2022. http://www.botanydictionary.org/circinate-vernation.html.
- Biology LibreTexts. “6.2.2: Ferns,” July 16, 2020. https://bit.ly/3WLAQad
- “Fern Reproduction.” Accessed April 1, 2022. https://www.fs.fed.us/wildflowers/beauty/ferns/reproduction.shtml.
- “Oxford University Plants 400: Matteuccia Struthiopteris.” Accessed April 1, 2022. https://herbaria.plants.ox.ac.uk/bol/plants400/Profiles/MN/Matteuccia.
- Cooperative Extension Publications. “Bulletin #2540, Ostrich Fern Fiddleheads, Matteuccia Struthiopteris - Cooperative Extension Publications - University of Maine Cooperative Extension.” Accessed April 1, 2022. https://extension.umaine.edu/publications/2540e/.
- Delong, John, D. Mark Hodges, Robert Prange, Charles Forney, Peter Toivenon, M. Conny Bishop, Michele Elliot, and Michael Jordan. “The Unique Fatty Acid and Antioxidant Composition of Ostrich Fern (Matteuccia Struthiopteris) Fiddleheads.” Canadian Journal of Plant Science 91, no. 5 (September 2011): 919–30. https://doi.org/10.4141/cjps2010-042.
- Nekrasov, Eduard V., and Vasily I. Svetashev. “Edible Far Eastern Ferns as a Dietary Source of Long-Chain Polyunsaturated Fatty Acids.” Foods 10, no. 6 (May 28, 2021): 1220. https://doi.org/10.3390/foods10061220.
- Chambial, Shailja, Shailendra Dwivedi, Kamla Kant Shukla, Placheril J. John, and Praveen Sharma. “Vitamin C in Disease Prevention and Cure: An Overview.” Indian Journal of Clinical Biochemistry 28, no. 4 (October 2013): 314–28. https://doi.org/10.1007/s12291-013-0375-3.
- Linus Pauling Institute. “Carotenoids,” April 28, 2014. https://lpi.oregonstate.edu/mic/dietary-factors/phytochemicals/carotenoids.
- Ho, Chi-Tang. “Phenolic Compounds in Food and Their Effects on Health I.” Phenolic Compounds in Food and Their Effects on Health I, n.d., 6. Boston, 677 Huntington Avenue, and Ma 02115 +1495 1000.
- “Omega-3 Fatty Acids: An Essential Contribution.” The Nutrition Source, September 18, 2012. https://www.hsph.harvard.edu/nutritionsource/what-should-you-eat/fats-and-cholesterol/types-of-fat/omega-3-fats/.
- Cleveland Clinic. “Omega-3 Fatty Acids: Foods & Benefits.” Accessed April 1, 2022. https://my.clevelandclinic.org/health/articles/17290-omega-3-fatty-acids.
- Harvard Health. “No Need to Avoid Healthy Omega-6 Fats,” May 1, 2009. https://www.health.harvard.edu/newsletter_article/no-need-to-avoid-healthy-omega-6-fats.
- Fan, Yang-Yi, and Robert S. Chapkin. “Importance of Dietary γ-Linolenic Acid in Human Health and Nutrition.” The Journal of Nutrition 128, no. 9 (September 1, 1998): 1411–14. https://doi.org/10.1093/jn/128.9.1411.
- Nutrition And You.com. “Fiddlehead Ferns Nutrition Facts and Health Benefits.” Accessed April 1, 2022. https://www.nutrition-and-you.com/fiddlehead-ferns.html.
**Permissions**
You’re welcome to share this blog post on social media and link back to it—please do! All images, photos, and written content are the creative property of the author and used with permission. If you’d like to reproduce or distribute any part of this content beyond social sharing, written permission is required.
**Disclaimer**
The information provided in this digital content is for educational purposes only and is not intended as medical advice, diagnosis, or treatment. It should not be used as a substitute for consultation with a qualified healthcare professional. Always consult a licensed healthcare provider before making any changes to your health regimen, especially if you are pregnant, nursing, taking medications, or have a diagnosed medical condition.
Matthew Wood, the Matthew Wood Institute of Herbalism, Earth to Stars Productions, and their employees, guests, affiliates, and collaborators assume no liability for the use or misuse of any information presented. The application of any material is solely the responsibility of the reader or participant.
Any descriptions of herbal or natural products, remedies, or techniques are for informational purposes only. These statements have not been evaluated by the Food and Drug Administration (FDA). This content is not intended to diagnose, treat, cure, or prevent any disease.
Participation in educational programs or use of this material does not confer certification, licensure, or professional qualification in herbal medicine or any healthcare field. Results or experiences described may vary and are not guaranteed.
This disclaimer shall be governed by and construed in accordance with the laws of Minnesota, USA, without regard to conflict of law principles.
Connect with us
Copyright © 2023-2026 Matthew Wood Institute of Herbalism